File Formats
The CorelDRAW file format provides fully-editable outlines of each map, with each country placed on a separate layer or for easy location and editing. Additional layers include rivers, major cities, graticules (lines of latitude and longitude), and scales. The Corel files also include a layer onto which the corresponding relief map TIFF file can be placed.
Corel has undergone many significant changes since inception. The Corel files in your Mountain High Maps collection are saved as CorelDRAW version 7.0 files and the tips explained in this document refer to Corel version 9.0.
Corel files are "vector" files, meaning they can be used at any size, without requiring any change of resolution - unlike the relief maps and masks, which are bitmapped, and which may require additional treatment in an image manipulation application if they are to be used at wildly differing sizes from the originals.
This map combines a CorelDRAW CDR file (for the coastline, country borders, rivers, cities, and graticules), and an imported JPEG colorized relief map image from the Mountain High Maps collection (file suffix "A") low contrast elevation style rendering.
 This map example shows the area of Disputed Borders in the Kenya / Ethiopia / Sudan region using border line color change to show jurisdiction problems, and an imported JPEG colorized relief map image from the Mountain High Maps collection (file suffix "Y") high contrast vegetation style rendering.
More detailed use of these files is given later in this guide. To use the guide, choose a chapter from the menu. For a more detailed contents list click in the MENU box at lower right of this window.
Layers Defined
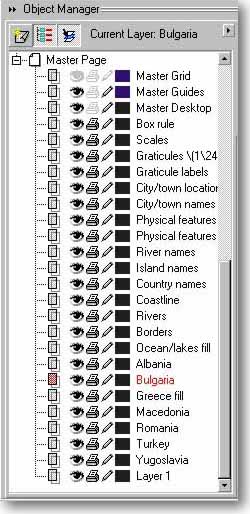
When you open one of the CorelDRAW .cdr files, you will be presented with a map featuring coastlines, borders, rivers, cities, names, graticules (lines of latitude and longitude), and a scale. Make sure you have the "Object Manager" open by choosing "Window > Dockers > Object Manager".
CorelDRAW creates default master layers, Grid, Guides, Desktop at the head of the Master Page layer stack ; it also creates layer 1 at the bottom of the master stack and the Page 1 stack. By clicking on the eye icon you make a layer visible or hidden. The printer icon controls whether or not the layer is printed, the pencil controls editing of the layer, the stacked pages indicates the master layer, and the red highlight indicates the active editing layer.
To be able to edit individual objects in a layer it is necessary to Ungroup the objects in that layer before editing. To do this, select the pencil for the layer you would like to edit. Next, choose "Edit > Select All > Objects" and "Arrange > Ungroup". Finally, use the Pick Tool to select and edit individual objects within the layer.
Master Grid, Guides, Desktop: These are Corel default layers created automatically when you open a file.
 Box rule: This is a 1 point black box rule of precisely the same size as the corresponding relief map on your Mountain High Maps disc.
Scales: This is a "grouped" graphic - to ungroup it, select "Arrange > Ungroup." Most of the projections used in the Mountain High Maps collection are "equal area," so the scale can be used to measure distances at any point on the map. However, some distortion occurs on the world maps, and on these maps the scale is calibrated at the Equator.
Graticules: This is a 0.25 point red line describing the meridians of longitude and parallels of latitude.
Graticule labels: This contains annotation for the intervals between each graticule, measured in degrees.
City/town locations: These are 1.5mm diameter black dots indicating the locations of major cities and towns.
City/town names: This layer displays the names of all of cities and towns featured on the opened map. The font used is Arial.
Physical features land: This layer displays the name of land features such as mountain ranges, peaks, and deserts.
Physical features oceans: This layer displays the names of ocean features such as seas, bays and straits.
Island names: This layer displays the names of individual islands and island groups.
River names: This layer displays the names of rivers featured on the opened map. The font used is Arial.
Country Names: This layer displays the names of all of the countries featured on the opened map. The font used is Arial.
Countries: When you select any country from those listed, that country will be visible as a 0.25 point (hairline) black path.
Coastline: This is visible as a 0.25 point (hairline) cyan path. NOTE: Some coastlines are very complex, and if you intend to print a complex map at a small size, the coastline may fill in unless it is printed as a very fine line or is made less complex.
Land fill: This layer contains a 30% cyan + 40% yellow fill for all land areas on the map.
Rivers: These are visible as 0.25 point (hairline) cyan paths.
Borders: These are visible as 0.5 point magenta paths. Country borders are mostly colored magenta; those borders which are colored purple are either disputed or undefined. Refer to the "Disputed borders" user guide document on this CD-ROM disc for more information.
Ocean / Lakes Fill: This layer contains white fills for lakes and inland water areas.
Layer 1: This layer may be used to place the corresponding grayscale or colorized relief map. If you plan to use relief in your map, be sure to make this layer active and Import a corresponding TIFF or JPEG relief map, and position the image exactly using the handles. For more about using the relief TIFF's and JPEG's, see the chapter describing Corel Photo-Paint operations or refer to the detailed Corel manual that is shipped with the software.
TIFF and JPEG bitmap relief map images may be prepared within Corel Photo-Paint and colorized to a customized format. Mountain High Maps also offers three colorized formats suffixed "A" for low-contrast elevation (as in 508gre3a.jpg), "P" for political format and "Y" for high-contrast vegetation style rendering.
Changing Fonts
Each text layer isolates the names of that specific layer, be it Towns, Rivers, Countries or Feature names. This makes it possible to collectively change the font , style, or weight selectively for that layer only from the default Arial font properties. All text layers may be selected for "across the board" changes that apply to the entire layer.
 To isolate a specific layer for editing, select the object layer so that it is highlighted red - this example shows the City/Town Names being selected.
Having selected the appropriate layers to change, use "Edit > Find & Replace > Replace Objects".
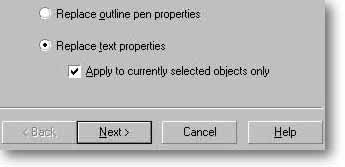
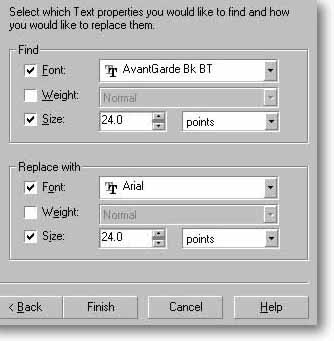
In the dialog box presented, select "Replace Text Properties" and if you only wish the highlighted layer to be affected, check the "Apply to current selected objects only" checkbox, otherwise all layers with the defined characteristics will be changed. In the Find and Replace dialog box you may then specify the existing font and styles you wish to replace and the new font style to be used. Options are presented for Font, Weight and Size. Press "Finish" to continue with the task.
 Further functions allow the option to step through the change item by item or complete replacement of all active edit layer items.
Corel 3.0 - 6.0 Users :
The Corel versions of Mountain High Maps are constructed with a very high degree of cartographic integrity, and consequently they are made up of very detailed layers and complex paths. Many features that Mountain High Maps take advantage of in Corel versions 7.0 - 9.0 are not found in earlier versions or if available does not operate at the functionality level of this Corel release. These include many new import and export filters, better handling of fills, outlines, bitmap images, better layer management (up to 200 layers on some Mountain High Maps), better graphics support.
Users of early versions of Corel are advised to upgrade to version 7.0 or later in order to be able to make full use of all the features found in these maps. If you open the Corel .cdr files with earlier versions of Corel you will encounter unexpected results. Similarly, the same restrictions apply to owners of any previous editions of software such as Photo-Paint, Photoshop, Illustrator or FreeHand that have not been upgraded.
Colorizing Relief TIFF's Using Photo-Paint
The Corel Suite makes available a close linkage and operation of the multiple Corel products, specifically CorelDRAW and Corel Photo-Paint. This relationship works to a great advantage with Mountain High Maps. We suggest a preparation and customization of the bitmap map images using the Corel Photo-Paint functionality, using Mountain High Maps masks to selectively color, shade and texture the maps, then importing this base map image and placing it behind the vector CorelDRAW line artwork, to build a professional map product with an unlimited number of variations and effects.
This chapter deals with the preparation and customization of a typical base bitmap map using Photo-Paint.
In Corel Photo-Paint, open the base map (grayscale land and sea floor relief bitmap version) "B" suffix version map, for example, 508GRE3B.JPG, then convert it to RGB, "Image > Convert to > RGB Color (24-bit)".
Now, load the mask to isolate the land from the sea, "Mask > Load > Load from Disk > 508MASKS > 508GRE3M.TIF" - this will then reveal the "marching ants".
To colorize the ocean, invert the mask "Mask > Invert". Select a color "View > Color Palette > Uniform Color" and choose your prefered blue or green tone for the sea or ocean area from the color selector strip on the right side of the window.
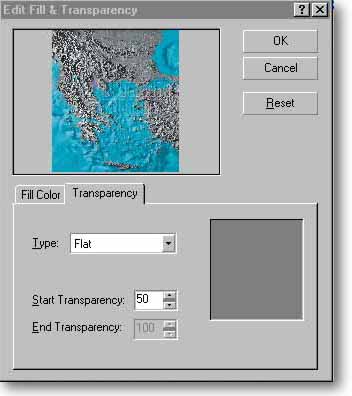 To apply the color to the ocean area, now apply the color tone "Edit > Fill", under the "Fill Color" tab select "Paint Color", then choose the "Transparency" tab, Type = "Flat" and set Start Transparency at a suggested value of "50" so that you can leave a screen downed impression of the ocean floor relief. Press "OK" to apply - wait this may take a few moments depending on the speed of the processor.
Transparency value set at "0" will place a solid color over all water and ocean area delineated by the mask, whereas a transparency value of "80" will allow the ocean floor relief to show through clearly and apply a tint of the paint color you selected.
Next, invert the mask and apply an appropriate tone or texture to the land area using a sepia or ground color throughout, use a transparency value of "80" that allow the land relief to show through strongly. Use the "Mask > Remove" to unload the ocean mask when you have finished.
To apply further color schemes, several tools are available that will allow shading and toning to customize the map to you taste. Typically an area of mountains can be selected using the Lasso tool and used to apply different tones for highland areas, or likewise for deserts or forested regions. Use the range of Corel Photo-Paint tools such as Paint Sprayers, Brushes and Transparency tools to achieve the desired effect.
After applying the land and sea tones, you can now apply Coastlines (508GRE3C.TIF), Country Borders (508GRE3D.TIF), Town Locations (508GRE3L.TIF), Shadows (508GRE3S.TIF), Vignette (508GRE3V.TIF) or any other feature available as a mask in the map collection.
Although the coastline is clearly visible, the map can be enhanced by adding a distinctive coastline line on the map. Use the mask 508GRE3C.TIF to apply a coastline or 508GRE3D.TIF to apply the border boundary line, using the same procedure listed previously for the ocean mask. Once loaded, the thickness of the coastline or a border can be increased to improve it's visibility, using "Mask > Shape > Expand" and setting the width of 2 to 5 pixels depending on the effect you are trying to achieve.
When you have finished, remove the mask and save the customized map file as a TIFF or JPEG format. Transfer now to CorelDRAW, open the equivalent vector CDR file - 508GRE3I.CDR, make the relief map visible by clicking to the left of the layer "Layer 1" on the Objects Manager, and import the bitmap file prepared above.
To allow the colorized relief to be visible, click off the Eye icon for the landfill layer, and also click off the Eye icon for the specific country layer you wish to see. In this way you can build a map that features selected countries in relief, with the added ability to apply text layers at will, giving an almost unlimited number of permutations of map presentations.
The relief map you customized in Corel Photo-Paint will now be placed on "Layer1" in the Object Manager. This relief map layer can be moved up or down the stack to hide information on the layers below, such as rivers, so drag the country layer and position appropriately to display the final map view. Other layers may also be moved up and down the layer stack, or switched on or off using the Eye icon to achieve your desired effect.
Using the Maps at Small Sizes
If you are going to use a map at a very small size, we suggest that, rather than use the main map for that area, you should use a detail of a much larger area.
For example, if your design calls for a map of Scandinavia to reproduce at a couple of inches wide, consider using a detail of "502 EEC" rather than a much reduced scaling of "510SCA". This is because the high detail of the latter map will cause the coastline to "clog" - that is, fill in with ink when reproduced at small sizes - resulting in a messy appearance. Map 502, on the other hand, offers much cleaner lines when reproduced at the same size. Examples of both are shown at right.
|

|
| Outputting Maps from CorelDRAW
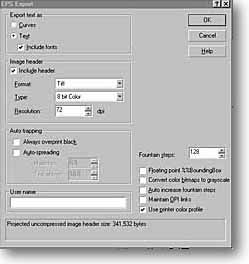
If you are going to use a map in another application, such as QuarkXPress, after you have worked on it in Corel, you must Export it as an "EPS" file. However, before you do so there are a few things you must do first:
If you want the relief TIFF to be embedded in the EPS, make sure that you have checked the Image Header information in the Export EPS file dialog box.
Although some layers of your map may not be visible, they will be included in the exported EPS file unless you have unchecked the Printer icon in the Object Manager.
|
