|
MapCatalog | Order | Support | SiteIndex | Contact | Home | ||||||||||
|
|
|
|
|
|
|
|||||||||||
| MH Maps | Photoshop | CorelDraw | Illustrator | FreeHand | Quark | |||||||||||

Online User Guide - QuarkXPress
Using Mountain High Maps with QuarkXPress
|
MapCatalog | Order | Support | SiteIndex | Contact | Home | ||||||||||
|
|
|
|
|
|
|
|||||||||||
| MH Maps | Photoshop | CorelDraw | Illustrator | FreeHand | Quark | |||||||||||
Online User Guide - QuarkXPress
Using Mountain High Maps with QuarkXPress
You can use Mountain High Maps in your QuarkXPress documents either as previously-colorized EPS image files, or directly as TIFFs. QuarkXPress does not allow editing of EPS files, but you can apply a wide range of effects and colorizings to the Mountain High Maps TIFF relief files and to the TIFF masks.
Getting Started
In a new document, create a picture box.
- Import the masked version of a relief map.
- Click-drag the corner of the picture box to fit the map.
- Experiment using the contrast settings under the "Style" menu.
- Use "Other Contrast..." to fine tune the map.
Colorizing Land Relief
Create a picture box and import the masked version of a relief map. Click-drag the corner of the picture box to fit the map. Make sure that the "Colors" palette is visible, then:
- Click on the map to make it active, if it isn't already. Define a color in the "Colors..." option under the "Edit" menu. Try 50% cyan + 80% yellow for the land.
- On the Colors palette, click on the picture box icon at the top of the palette, then click on a color in the list.
Adding Color to Ocean Areas
A quick and easy way of applying color to ocean areas is simply to apply a color to the picture box background. However, this technique also adds the ocean color to the land relief, which you may not want.To add an entirely different color to the ocean areas without affecting the land relief, use the TIFF ocean mask as follows:
- With the relief map picture box active, choose "Step and Repeat..." from the "Item" menu. Enter horizontal and vertical offsets of zero. Click "OK."
- Without deselecting the cloned picture box (which contains a duplicate of the relief map), import the Ocean mask for your map. This replaces the duplicated relief map.
- Apply a color to the mask -- try a 20% tint of cyan.
Selective Colorizing
You can apply selective color to a map in QuarkXPress as follows:
- Clone the relief map as described above.
- Apply a color to the cloned relief map, different from original.
- Drag the corners of the cloned picture box to where you want the selection to appear. The map will remain in the exact same place above the original, unless you move the entire picture box -- so don't!
You can create circular or irregular selections by changing the picture box shape.
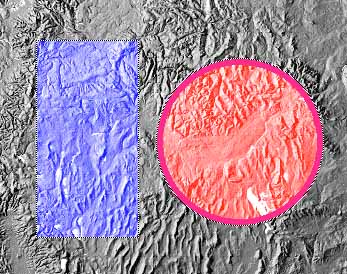
It's possible to create selectively colorized areas of a map within QuarkXPress by first cloning your map, then redefining the area or picture box shape -- just drag the corners of the picture box, but don't move the picture itself.
Creating a Duotone in QuarkXPress
It's possible to define duotones directly within QuarkXPress, without going through an image-editing application such as Photoshop first, but control over the result is limited, and, unlike Photoshop, you can't preview the results before output. The following procedure uses black and magenta, but you can define other colors by using the "Colors..." dialog ("Edit" menu):
- Draw a picture box, and insert your map image using "Get Picture" from the "File" menu.
- Clone the image by entering zero offsets in the "Step and Repeat..." dialog ("Item" menu). This will be the black component.
- If you leave the black component as it is, the printed duotone may appear too heavy. To avoid this happening, modify the contrast of the black component. Do this by choosing "Other Contrast..." from the "Style" menu. In the dialog box which appears, use the grabber hand to move the diagonal line. This will make the black component a little lighter, but you may have preferences for other contrast settings -- try some out.
- Now work on the magenta component of the image. Send the black component to the back ("Item" menu) to reveal the magenta component (it is still black at this stage). Deselect the black component by clicking anywhere outside the picture box -- if you don't do this, any further action you take will only apply to the image at the back.
- Click inside the picture box to select the top picture. Using the "Colors" palette, click on the picture box icon (the one with the diagonal cross) and then on the word "Magenta" in the color list. The map will now be a magenta color.
- QuarkXPress has an automatic "trapping" feature, which "knocks out" that part of an image which goes behind another. Consequently, if you were to separate your duotone as it stands now, the black component will not print at all (the magenta component will "knockout" the black component). To override QuarkXPress defaults, select "Overprint" from the pop-up menu in the "Trap Information" palette (make sure that the magenta component picture box is active).
- If you are using a color other than a process color, you may have to specify the halftone screen angle for the second color. Do this by choosing "Other Screen..." from the "Style" menu (the relevant picture box must be active first). The box, right, lists suggested screen angles.
Using the Masks with QuarkXPress
The masks can be used in QuarkXPress as a way of creating quick and easy maps. Each of the masks for a map can be laid one on top of the other (use "Step and Repeat" with zero values in the offset fields).To apply two colors to a single mask, use the Style menu ("Color") for the mask contents and the Item menu ("Modify...") for the background color.
To apply colors to multiple masks which are stacked one on top of the other, make sure that the background color for all of the items (except the bottom layer) is set to "None." Apply a box rule to the top layer only. When you have completed your map save it in a new XPress library for future use ("New" > "Library..." from the "File" menu).
The masks can be used very effectively in QuarkXPress version 4.0 as a means of creating dropouts for text runarounds.

|
MHM
tip
USING MASKS FOR TEXT RUNAROUND EFFECTS
The map masks are useful for creating simple but effective text runarounds in QuarkXPress. The example here uses the mask from the map of Africa (modified slightly to remove inland water areas, which would get in the way of the text), which has been positioned over the text. In the "Runaround" dialog, choose "Non-white Areas" in the "Type" pop-up menu. Make sure that "Invert" and "Outside edges only" are unchecked. |
Any comments or problems with this
site? Please
let us know
- thank you!
©2017 Digital Wisdom, Inc.